
How to Saber Champagne?
The moment a champagne bottle is sabered is nothing short of mesmerizing—a perfect blend of precision, tradition, and boldness that transforms any celebration into a truly memorable experience. Far from just a flashy party trick, champagne sabering is a centuries-old ritual that dates back to the Napoleonic era. Picture soldiers, freshly victorious, slicing the tops off champagne bottles with their swords, marking their triumph with an explosion of bubbles.
To saber champagne, you hold a properly chilled bottle at a 45-degree angle and slide a blunt blade firmly along the seam toward the lip, striking it cleanly to pop off the cork and collar in one swift motion.
But you don’t need a battlefield or a sword to master this elegant technique today. Sabering champagne is about understanding the right moment, the right bottle, and the right method. To saber champagne, you’ll need to chill the bottle properly, hold it at the correct angle, and with a confident yet smooth motion, glide the saber along the bottle’s seam to pop the cork off cleanly. It’s a blend of art and science, where precision meets flair.
Whether you’re marking a milestone or simply impressing your guests, the appeal of mastering this skill is undeniable. It’s more than just opening a bottle—it’s a statement, a celebration of tradition, and an invitation to revel in the elegance of the moment. And as you stand there, saber in hand, ready to create that unforgettable pop, you’ll understand why this age-old practice has endured through the ages.
Explore more about the art of champagne sabering and find the perfect tools for the job at California Champagne Sabers. Visit our Champagne Sabers Collection to discover a range of finely crafted sabers that can elevate any celebration.
Key Takeaways
Champagne sabering is a celebratory technique that uses a blunt saber to cleanly break the neck of a chilled bottle along its seam.
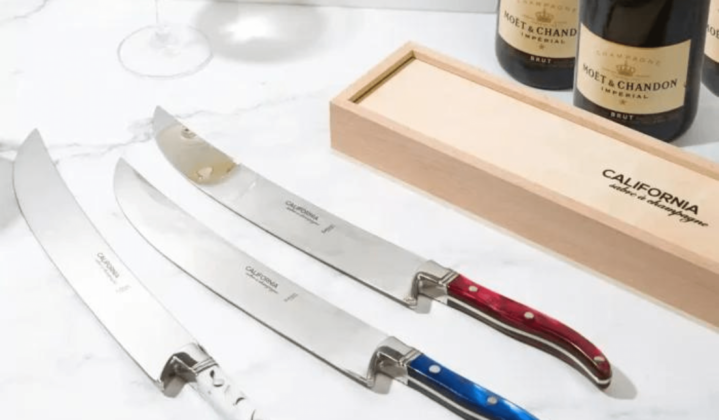
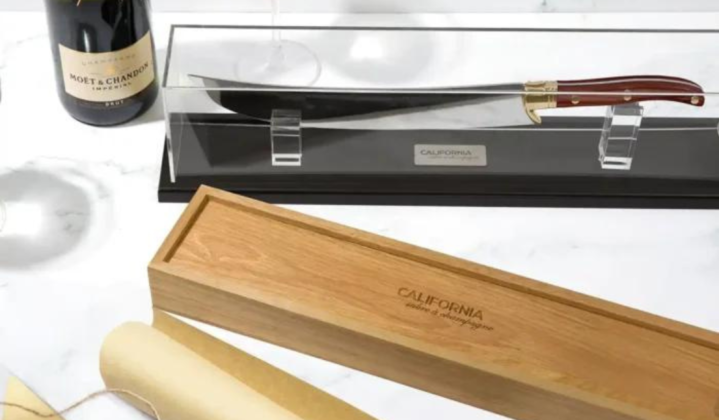
A champagne saber is specially designed with a blunt blade and ornate handle to enhance both performance and presentation.
Bottle selection matters—choose one with high pressure, a visible seam, and a properly chilled temperature for clean sabering.
The history of sabering dates back to Napoleonic times, where it symbolized victory and celebration among French cavalrymen.
Proper preparation involves chilling the bottle, removing the foil and cage, and following a confident gliding motion along the seam.
Beyond the Basics of Champagne Sabers
A champagne saber is no ordinary kitchen tool; it’s a sleek, specialized instrument designed for a singular, celebratory purpose. Unlike traditional knives, which have a sharp edge meant for cutting, a champagne saber features a broad, blunt blade. The blade isn’t intended to slice through the glass but rather to break the neck of the bottle cleanly, using the bottle’s own pressure.
The saber typically has a curved, slightly elongated blade, allowing for a fluid, gliding motion along the seam of the bottle. The handle is often ornate, reflecting the saber’s ceremonial role in celebrations. This design ensures that, with the right technique, the saber catches the lip of the bottle with just enough force to send the cork flying—without shattering the glass.
But why not just use a regular knife? The answer lies in the ritual itself. The champagne saber, with its historical ties to victory and celebration, adds a sense of occasion to the act of opening a bottle. It’s about the experience, the flourish, and the tradition. The saber’s design and function are perfectly suited to this ritual, making it the preferred tool for those who wish to saber champagne with style and precision.
Choosing the Right Champagne
Not all champagne bottles are created equal, especially when it comes to sabering. The shape of the bottle, the pressure inside, and the temperature at which it’s served all play crucial roles in the success of your sabering attempt.
When selecting a bottle, opt for one with a longer neck and a distinct seam, as these features make it easier to guide the saber along the bottle. Pressure is another key factor—most champagne bottles are pressurized at around 90 pounds per square inch, which is more than sufficient for sabering. However, make sure the bottle is properly chilled, as warmer bottles are more likely to shatter rather than saber cleanly.
As for brands, consider classic choices like Moët & Chandon, Veuve Clicquot, or Perrier-Jouët. These brands, known for their quality and consistency, offer both vintage and non-vintage options that are ideal for sabering. Non-vintage champagnes tend to be more forgiving, making them a great choice for beginners.
When choosing a bottle, avoid those with any damage or imperfections, as these can compromise the integrity of the glass and lead to unwanted accidents. Also, steer clear of overly warm bottles or those that have been shaken, as the increased pressure can make sabering more unpredictable.
The History Behind Champagne Bottle Sabering
Champagne sabering isn’t just an extravagant way to open a bottle—it’s a tradition steeped in history and honor. The origins of this practice trace back to the Napoleonic era when French cavalrymen, known as hussars, would celebrate their victories by using their sabers to open bottles of champagne. Napoleon Bonaparte himself is often quoted as saying, “Champagne! In victory, one deserves it; in defeat, one needs it.” This ritual became a symbol of triumph, with the soldiers skillfully slicing the necks off bottles as a way to both celebrate and impress.
The saber, with its association with military prowess and honor, became a natural tool for this celebratory act. Over time, the tradition evolved, moving from the battlefield to more festive occasions, yet it has always retained that sense of boldness and elegance. Today, sabering champagne is a nod to this storied past, a way to channel a bit of history and tradition into modern celebrations.
Whether you’re aware of its origins or simply appreciate the spectacle, each time you saber a bottle, you’re participating in a centuries-old ritual that connects you to a rich history of celebration and victory. So, the next time you saber a bottle of champagne, take a moment to appreciate the history behind the act—it’s not just about popping the cork, but about honoring a tradition that has been passed down through generations.
Preparing for Sabering
Safety first—sabering champagne is a thrilling experience, but it’s important to take the necessary precautions to ensure it’s also a safe one. Always point the bottle away from yourself and others, and make sure you have plenty of space around you. Remember, the cork will be launched with considerable force, so be mindful of where it might land.
Properly chilling the bottle is crucial. Aim for a temperature between 45°F and 50°F (7°C to 10°C), which is typically achieved by leaving the bottle in ice for about 20 to 30 minutes. This not only enhances the champagne’s flavor but also helps the glass become more brittle, making it easier to saber.
Positioning the bottle correctly is an art in itself. Hold the bottle at a slight upward angle—about 30 to 45 degrees—while ensuring that the seam of the bottle faces up. This seam is your guide, the path along which your saber will travel. With your saber in hand, align the blade with the seam, and with one swift, confident motion, glide the saber along the seam toward the bottle’s lip. Done correctly, the pressure inside the bottle will do the rest, sending the cork and the top of the neck flying.
These steps, when followed with care and attention, set the stage for a successful and safe sabering experience, allowing you to revel in the moment with all the style and tradition that comes with this timeless art.
The Sabering Technique: Step-by-Step Guide on How to Saber Champagne
Sabering champagne is a blend of finesse and confidence, where each step plays a crucial role in achieving that perfect, clean cut. Here’s a detailed, step-by-step guide to mastering this technique:
Step 1: Chill the Bottle Properly
Before you even think about reaching for the saber, ensure the champagne bottle is well-chilled. The ideal temperature is between 45°F and 50°F (7°C to 10°C). This chilling process not only enhances the flavor but also makes the glass more brittle, which is essential for a clean saber. Place the bottle in an ice bucket for about 20 to 30 minutes to reach the desired temperature.
Step 2: Remove the Foil and Wire Cage
Once the bottle is chilled, carefully remove the foil that covers the cork. Next, untwist and remove the wire cage that secures the cork. Be sure to keep your thumb over the cork while doing this, as the pressure inside the bottle could cause the cork to pop prematurely.
Step 3: Locate the Bottle’s Seam
Every champagne bottle has a seam—an invisible line where the two halves of the bottle mold meet. This seam runs vertically from the bottom to the top of the bottle. Hold the bottle by its base, with the seam facing upward. The seam will serve as your guide for the saber.
Step 4: Position the Bottle
Hold the bottle at a 30 to 45-degree angle, pointing away from you and anyone else nearby. The bottle should be slightly tilted upwards. Ensure you have a clear space around you, as the cork will be launched with significant force.
Step 5: Grip the Saber
Hold the saber firmly with your dominant hand, gripping it near the blade’s base for maximum control. The blade of the saber should be flat against the seam of the bottle. Remember, the blade is not sharp—its purpose is to apply the right amount of pressure to the glass.
Step 6: The Sabering Motion
With a confident and smooth motion, slide the saber along the seam of the bottle. Start from the middle of the bottle and move upward towards the cork. The saber should maintain constant contact with the bottle as it glides along the seam. When the saber hits the lip of the bottle, it will apply just enough pressure to cleanly break the glass and send the cork flying.
Step 7: Pour and Serve
After successfully sabered the bottle, it’s time to serve the champagne. Hold the bottle at an angle and pour the champagne gently into glasses. Be mindful of any small glass fragments that might have formed during the sabering process. Pour slowly to allow the bubbles to settle, and serve immediately to your guests.
Troubleshooting Tips
- Cork Doesn’t Fly Off: If the cork doesn’t come off cleanly, it could be due to insufficient pressure or a dull motion. Try again with a more confident, sweeping motion.
- Bottle Shatters: This usually happens if the bottle is too warm or if excessive force was used. Ensure the bottle is chilled and try again with a lighter touch.
After the Saber
Once the bottle is sabered, the celebration begins. Pour the champagne immediately to maintain its effervescence, and serve it to your guests with the pride of knowing you’ve mastered a centuries-old tradition. If any small fragments of glass remain, use a strainer to catch them as you pour. Finally, enjoy the moment and the admiration of those around you—sabering champagne is a skill few have mastered, and you’ve done it with style!
Practicing the Art of Sabering
Mastering the art of sabering doesn’t happen overnight, and it’s wise to practice with less expensive bottles before moving on to premium champagne. Start with sparkling wines or budget-friendly champagnes that mimic the pressure and glass thickness of high-end options. These practice sessions will help you build confidence and perfect your technique without the fear of wasting an expensive bottle.
As you practice, focus on the fluidity of your motion. The key is to maintain a consistent, smooth glide along the bottle’s seam. Avoid jerky movements or applying too much force, as this can cause the bottle to shatter rather than saber cleanly. With time, you’ll develop a feel for the right amount of pressure and the perfect angle.
To further hone your skills, consider watching video tutorials that demonstrate the sabering technique in detail. Many experienced sabreurs offer step-by-step guides, breaking down the process and sharing tips to help you refine your approach. By studying these videos, you can observe different techniques, learn from common mistakes, and gradually improve your own sabering prowess.
Celebrating with Saber Champagne
Once you’ve mastered sabering, it’s time to think creatively about how to present your newly acquired skill. Sabering a bottle of champagne is more than just an act—it’s a performance, and the way you present it can elevate the entire event. Consider adding an element of surprise by performing the saber at a dramatic moment, such as the climax of a toast or the start of a celebration.
To enhance the experience, pair your sabered champagne with carefully selected foods. Classic pairings include oysters, caviar, and light appetizers that complement the delicate flavors of champagne. You can also experiment with more adventurous combinations, such as pairing a vintage champagne with rich cheeses or dessert items.
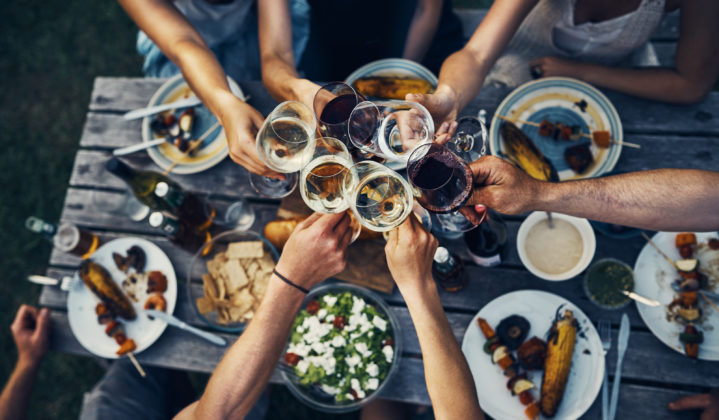
As for the best occasions to saber champagne, think of moments that are steeped in significance—weddings, anniversaries, milestone birthdays, or even New Year’s Eve. These events naturally lend themselves to the grandeur of sabering, turning an already special occasion into something truly memorable. With each sabered bottle, you’ll not only impress your guests but also create lasting memories that will be talked about long after the last glass is emptied.
Celebrating the Art of Sabering Champagne

Mastering the art of sabering champagne is about more than just opening a bottle—it’s about embracing a tradition that combines elegance, precision, and a touch of daring. Each step, from selecting the right champagne to the satisfying moment when the cork flies, adds to the allure of this age-old practice. Whether you’re celebrating a milestone or simply adding flair to a gathering, sabering transforms an ordinary moment into something truly extraordinary.
As you perfect your technique, remember that each successful saber is not only a triumph of precision but also a continuation of a centuries-old tradition that has delighted celebrants for generations. With practice, patience, and a touch of flair, you too can join the ranks of those who have added their own sparkle to the art of sabering champagne. So, next time you find yourself with a bottle of bubbly in hand, consider reaching for the saber and making your celebration truly exceptional. Here’s to the thrill of the saber and the memories it helps create—cheers!
Ready to impress your guests and create a moment they’ll never forget? Grab your saber from us at California Champagne Sabers, uncork the excitement, and let the celebration begin!
Frequently Asked Questions
1. What is the correct angle for holding the saber?
When preparing to saber a champagne bottle, it’s essential to hold the saber at the correct angle to ensure a clean and successful cut. The ideal angle is around 30 to 45 degrees. This angle allows the flat side of the saber to maintain full contact with the seam of the bottle as you slide it toward the lip. The goal is to direct the force precisely at the weakest point of the bottle, which is just below the lip where the seam ends. By holding the saber at this angle, you maximize the impact force at the critical point, enabling the saber to break the glass cleanly without shattering the entire bottle.
2. What should I do if the bottle doesn’t open after the first attempt?
If the champagne bottle doesn’t open after the first attempt, carefully inspect the bottle to ensure it hasn’t been damaged or cracked during the initial strike. If the bottle is intact, reassess your technique. Ensure the saber is properly aligned with the seam of the bottle, and that you’re holding it at the correct angle. Attempt the saber again, using a smooth, confident motion with a firm follow-through. Avoid hesitating or pausing mid-swing, as this can reduce the effectiveness of the strike. If the bottle still does not open after several attempts, consider switching to a conventional method of opening the bottle to prevent any risk of injury.
3. What type of saber or sword should be used for sabering champagne?
For sabering champagne, a specialized champagne saber or sword is recommended. These sabers are typically shorter and have a blunt, unsharpened edge, designed specifically for the task. The blade is usually made of stainless steel and is heavy enough to provide the necessary force to cleanly break the bottle’s neck without requiring a sharp edge. Traditional swords like a cavalry saber or even a machete can be used, but it’s crucial that they are not too sharp, as the goal is to apply pressure to the bottle’s weak point, not to cut through it. Using a tool specifically designed for sabering ensures better control and safety during the process.
4. What should I do after successfully sabering the champagne?
Once you have successfully sabered the champagne bottle, it’s important to take a few steps to ensure safety and proper presentation. Carefully inspect the bottle’s neck to confirm that no shards of glass remain attached, as these could pose a danger when pouring. Hold the bottle at an angle to minimize the champagne’s pressure and to avoid spilling. Gently pour the champagne into glasses, taking care to do so over a surface that can catch any excess liquid. Expect some champagne to overflow, especially if the bottle was vigorously shaken or jostled during sabering. Once the champagne is poured, safely discard the severed bottle top, which will likely have sharp edges. You can then enjoy the champagne and the celebratory moment!
5. How can I clean up the broken glass safely after sabering?
Cleaning up broken glass after sabering champagne requires caution to avoid injury. Start by putting on protective gloves to protect your hands from cuts. Begin by picking up the larger pieces of glass and placing them into a thick, puncture-proof container, such as a sturdy cardboard box or a metal can. For smaller shards, use a broom and dustpan to sweep them into a pile, making sure to get into corners and edges where glass can scatter. Once the visible glass is cleared, use a damp paper towel or cloth to wipe the area thoroughly, as this will help pick up tiny fragments that are difficult to see. If the sabering was done on a hard surface, consider using a vacuum cleaner to ensure all glass particles are removed. Lastly, dispose of the broken glass safely, ensuring that it is securely contained to prevent injury to anyone handling the trash later.
Cheers for now, and happy sabering!
California Champagne Sabers