DIY Champagne Saber Making Guide to Creating Your Own Champagne Saber at Home
Making a champagne saber at home blends craftsmanship with celebration. For those intrigued by the dramatic flair of sabrage, creating a personalized saber offers both a hands-on project and a meaningful piece for special moments. From shaping the blade to finishing the handle, each step allows room for customization and creativity. While store-bought sabers vary in style and material, a homemade version can reflect individual taste and purpose.
This guide explores how to make a champagne saber safely using tools that are accessible and techniques that prioritize precision. It covers the essential materials, step-by-step crafting process, finishing touches, and safety measures to follow throughout. Whether you’re building it for ceremonial use or as a conversation piece, this overview offers everything needed to create a champagne saber that is both functional and uniquely yours.
Understanding the Purpose of a Champagne Saber
Champagne sabers are ceremonial tools used to open champagne bottles with a swift strike along the neck. Unlike traditional blades designed for cutting, a champagne saber relies on momentum and the bottle’s pressure to cleanly break the glass at the seam. The blade itself does not need to be sharp, but it must be durable enough to withstand repeated impact.
Knowing the intended use of the saber informs every decision during the crafting process. Weight, balance, and grip all play a role in how the saber performs. This section also sets expectations for what a homemade saber can and cannot do. It may not match the precision of factory-made models, but it can still offer satisfying results when used correctly.
Materials You Will Need to Make a Champagne Saber
Choosing the right materials is the foundation of any successful DIY saber project. Each component contributes to the saber’s look, feel, and durability.
Blade Material Options
- Stainless steel is the most popular option because it resists rust and offers a sleek finish. Repurposed stainless putty knives, retired machete blades, or even old flatware can serve as the base.
- Carbon steel is another choice for those with access to grinding and finishing tools. It requires more maintenance but offers a rugged aesthetic.
- Aluminum is lightweight and easy to shape but not recommended for actual sabering use. It works best for decorative models.
Handle and Grip Components
- Wood blocks such as maple, walnut, or oak are easy to shape and sand. They provide a classic look and ergonomic feel.
- Resin or acrylic slabs can be used for a modern or colorful finish.
- Epoxy putty or glue will secure the blade inside the handle.
- Pins, rivets, or screws are added to reinforce the structure and offer decorative appeal.
Finishing Materials
- Sandpaper in various grits for shaping and polishing
- Metal polish or clear coat for shine and protection
- Leather strips or cord for wrapping the handle
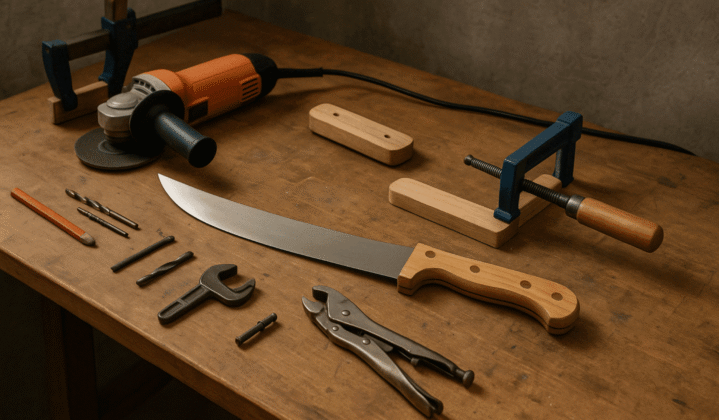
Tools Required for Building Your Saber
Creating a DIY champagne saber requires more than just materials. The right tools ensure a safe and precise construction process.
- Bench vise for holding pieces in place while grinding or shaping
- Angle grinder or belt sander for working the metal blade into shape
- Drill and drill bits for installing pins or rivets in the handle
- Hacksaw or coping saw for cutting wood or acrylic pieces
- Clamps for holding the handle while gluing
- Protective equipment including safety glasses, gloves, and a dust mask
These tools are commonly found in home workshops or can be borrowed from local makerspaces. Using high-quality tools reduces the risk of injury and improves the final outcome.
Step-by-Step Process for Making a Champagne Saber
Creating a saber involves careful planning and execution. Rushing through the process increases the chance of mistakes or injuries. Follow each stage with patience and precision.
Shaping the Blade
- Trace the outline of the blade shape onto your chosen metal.
- Use an angle grinder or belt sander to follow the shape, refining the edges until smooth.
- Round the tip of the blade to avoid sharp points.
- Polish the blade using fine-grit sandpaper or metal polish for a clean finish.
Constructing the Handle
- Cut two identical slabs of wood or acrylic to sandwich the tang of the blade.
- Drill holes for rivets or pins if you want added stability.
- Apply epoxy and clamp the pieces tightly around the tang.
- Let the glue cure for 24 hours before moving on.
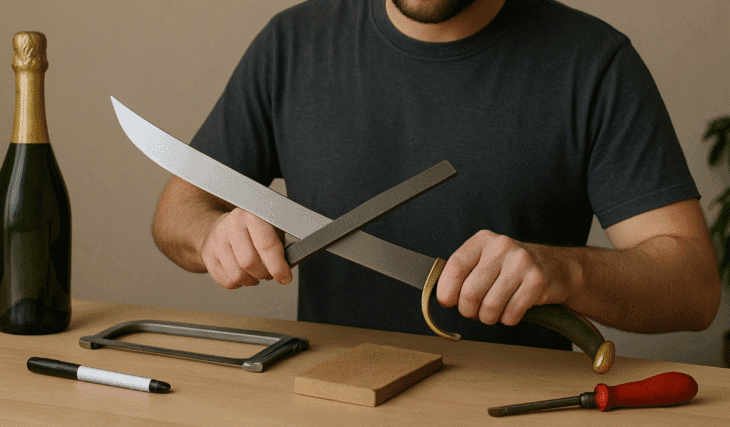
Final Touches
- Sand the handle to create an ergonomic shape.
- Apply finish, polish, or wrap to complete the handle’s look.
- Inspect for stability and make sure the blade is secure.
Safety Tips for DIY Champagne Saber Making
Working with metal and tools presents clear safety concerns. Gloves and eye protection are non-negotiable when cutting or grinding. Avoid working near flammable materials, especially when using power tools that may spark.
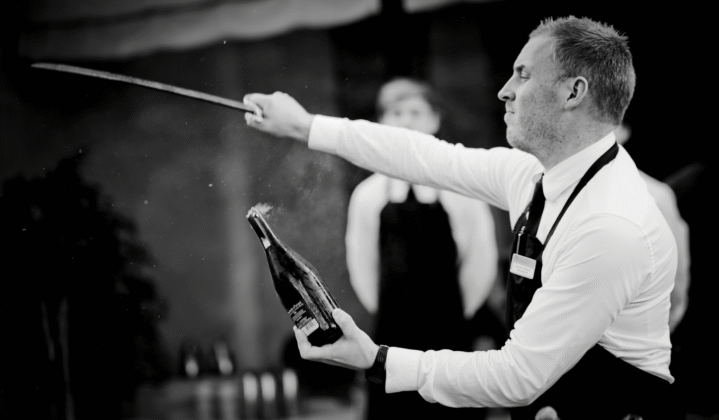
When sabering, never point the bottle at yourself or others. Chill the bottle beforehand and strike at the seam near the lip. Practice with protective gear and outside if possible. Even with a well-made saber, poor technique can result in broken glass and injuries.
Design Ideas and Personalization Tips
A DIY champagne saber is a canvas for expression. Some choose to engrave their initials or a meaningful date onto the blade. Others add color by painting the handle or using resin inlays. Wrapping the grip with cord or leather also enhances appearance and comfort.
Customization is not just aesthetic—it can make the saber easier to use. A curved handle may improve grip, while texturing adds security. These creative additions transform the saber into a piece worth displaying even when not in use.
When to Use Your Homemade Champagne Saber

Homemade sabers are ideal for outdoor celebrations, milestone events, or as part of a themed occasion. While they may not be suited for professional sabrage, they are perfectly capable of popping bottles with style when used carefully.
Use your saber during New Year’s Eve, weddings, anniversaries, or holiday dinners. The tool becomes a centerpiece, turning any toast into a memorable performance. Just make sure to practice beforehand and understand the sabering process thoroughly before the big moment.
Crafted to Celebrate

Making your own champagne saber at home is both a creative challenge and a rewarding achievement. It offers a way to engage with tradition in a modern, hands-on way. From selecting materials to crafting the handle and perfecting the blade, each stage contributes to a piece that reflects your personality and skill.
Whether your goal is functional sabering or decorative display, a homemade saber becomes a meaningful part of your celebrations. For those who want to take their craftsmanship even further, engraving adds a personal detail that lasts—whether it’s initials, a special date, or even one of our famous quotes for champagne saber engraving. Font selection can enhance the look as well, with options ranging from classic script to bold serif styles that match the tone of the event or recipient.
At California Champagne Sabers, we offer a curated collection of premium sabers in various styles and sizes. From compact pieces perfect for casual sabrage to larger ceremonial sabers built for grand openings and milestone toasts, each item in our collection can be customized for personal or corporate gifting. Whether you’re looking to commemorate an occasion, impress a client, or complement your handmade saber with a professionally engraved piece, our collection is designed to inspire and celebrate with elegance.